GoPro Hints, Tips and Tricks

Small, portable, adventure proof cameras are now an essential holiday item, you can take them diving on the Great Barrier Reef or Skydiving from 14,000 ft. They are appearing more and more in handbags and backpacks for taking a still shot or short video to capture the moment. Their robust design means you don’t need to worry about how you pack or treat them and the images they take are excellent quality, making them invaluable on holidays. Some of the latest model are even waterproof without a protective case, making them even more robust.

In this post there are hints, tips and tricks I’ve learned over the years getting to know my GoPro cameras. There are also links to some of the best tutorials, blogs and ideas I’ve found and tested in an attempt to get the most out of the cameras. I’ve also added a few videos I’ve made and photos as examples, the header photo was also taken with a Gopro, and a most of our tour videos on our YouTube Channel were shot on a Gopro.

One of my main objectives with this blog is to help make sure more time is spent enjoying the adventure you’re on while still getting as much cool footage as possible. There is a fine line between getting lots of footage and making the most of what you’re doing. Also remember that no one wants to watch hours of raw footage, so while taking it is easy you still need to edit it and the better you plan your filming, the easier the editing is.

Note that I use multiple GoPros (an older Hero 2, & Black 5) when travelling but even if you own something different these points will still be relevant. Below are some of the tips, tricks and advice I came up with and I hope they work for you.


Return to Top

Getting to know your GoPro

Read the manual, understand, and test the camera at home before you use it on holidays. It saves so much time, battery power and hassle if you know what you are looking for when changing settings.
Set it up before leaving home and read the Pro Tips on each page of the manual, they’ll help a lot. Download and connect the app too.
Even if you are buying your camera duty free, once you have researched the camera and decided which one to buy, download the manual and give yourself a head start. If you are trying to learn about your camera while on your tour you could be missing the best part of the tour.

Return to Top

….. ensure you read the ‘Pro tips’

Practice, Practice ……

… and more practice! Steady hands are really important, it’s extremely frustrating looking at footage you think will be really good, only to see that you’re shaking the camera around. Two hands is good (keeping fingers away from the lens) and there are a range of long and short poles that can help. The grenade and GoPole are just a couple and knowing your mounts and accessories, and being steady will help make sure you can use all the footage you get.

Make sure your battery (or batteries) are charged and your SD card/s are empty or have enough space. Also make sure the SD card is in the camera. There’s nothing worse than having all your dive gear on, getting ready to film, turning the camera on and seeing ‘NO SD’ on the screen. Remember, the higher resolution and frame rate, the more storage space is used.

Return to Top

Plan your trip

Plan your trip, even if it’s only a basic plan in your head. If you think about the trip before you leave, or write it down, you can plan for certain shots, angles and gear you will need. You will be surprised how this helps with saving time and battery power. It will also help you to get those really great angles.
Below is one of our customer’s videos of a Moreton Island tour and it shows great use of different filming angles and the intersplicing of stills and video.

Return to Top

Simultaneous Video and Photo Mode

Try using the ‘Simultaneous video and photo mode’ to take photos and film at the same time. If you use it with ‘one button mode’ it means you literally turn the camera on and it films and takes photos straight away. One button mode sets the camera to start filming as soon as you turn it on. The simultaneous video and photo mode sets the camera so it films and takes  photos at intervals you set. Photo interval options are; 5, 10, 30 and 60 seconds.

It can only be used in certain resolution settings (1080p 24fps, 1080p 30fps, 720p 60fps, 1440p 24fps) and is not an available feature on some of the newer camera. For fast moving filming the stills can be a bit blurry but there are often good shots in there.

For more information on the best settings for different types of filming including slow motion and time lapse, check out the below resources from Ben Southall.

Return to Top

GoPro Mounts

Be familiar with the different mounts you have and set up the mounts so you can easily move cameras if needed. For example have screws ready to go in other mounts and if you have more than one camera have them set up on the mounts before you go. Moving cameras from mount to mount (eg head mount to chesty or to handlebar mount) may not seem like it would take a lot of time but it all adds up. That said also keep an eye out for the cool angles you didn’t prepare for and have extenders, they come in handy.

You can drop things too if you’re fiddling around in the middle of an adventure. A friend of mine dropped his camera in the water, and remember the early GoPros are only waterproof if in the right case.


Return to Top

Custom GoPro Mounts

You can make custom mounts too. The base that the GoPro comes on can be used the way it is for a stable flat mount or customized. I cut mine down, put holes in each corner and use cable ties to attach it to my bike and other surfaces. I also changed the bike helmet strap to attach it to the bottom of my bike seat for a backwards angle.
You can also use an egg timer as a mount to get a 360 pan for time lapses by mounting the GoPro on it. If possible always have electrical tape, duct tape or cable ties with you, they always come in handy.


Return to Top

GoPro Spares

If you have spares and mounts, make sure they are easily accessible and in dry, safe storage. Especially if you have extra SD cards and batteries. If you’re getting bulk footage, have spare, empty cards ready to go. The bigger the memory the better, 32 gig will store quite a lot. File sizes can be very large given the high definition and high frame rates the GoPro films in. Use class 10 mini SD cards and always have an adapter since most computers have an SD card slot for the bigger SD cards.

As for storage I use a camera bag since I can fit everything I need in it and it has a shoulder strap, pockets and separate compartments but the tough waterproof cases you can get are pretty good too.


Return to Top

Other GoPro Tips

Get close to the subject or action you’re filming. GoPro’s don’t have zoom so the closer you get the better. You can zoom in with editing software but it can lower the quality.
This blog about understanding your new GoPro is really easy to understand and good to get an idea on the different filming options and settings for GoPro Cameras.For checking shots, the GoPro app is perfect to see if you have the frame you want. You can also playback on it, download and share content. Well worth downloading. The wifi can have a bit of lag between the camera and the app for the preview. Sometimes it doesn’t have great range so test it before going on a trip and make sure you’re fully aware of how it works and test the range. Same goes for the remote but connectivity is getting much better.

If using red or UV filters for filming and taking photos in the water be aware that they really aren’t needed until you get to depths below 2.5 or even below 5 meters. If using them just when snorkelling or swimming the photos and videos will come out with a red tinge. In the water try not to shoot straight down, your shadow will get in the way.

GoPro cameras love sunlight, blue sky’s, clear water, and white sand or snow. Mix as many of these things in your footage and photos and you’ll be happy with what you get.

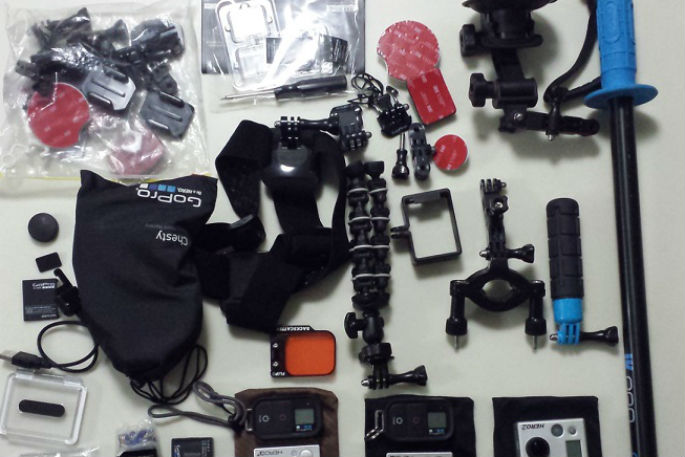
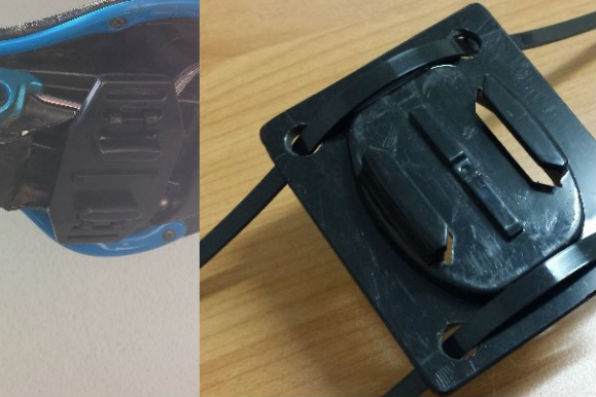
Make sure the nuts are in your mounts! Sometimes the little nuts on the mounts can come loose and fall out and just when you need them you can find they are gone and have fallen out so just check you have then all before leaving the house.

Battery change early. If you’ve got half battery but you know that the next part of your adventure will be a long one don’t be afraid to charge or change batteries early to make sure you have enough. You can always use the other half later if you need it.

Always have a lens cloth or two handy. I actually have each GoPro in a sunglasses bag made of lens cleaning material and then a spare lens cloth in each bag, that way I always have something to clean the lenses with.

Use lanyards. It’s worth having lanyard, string or fishing line attached to your wrist, board, bike or anything in a situation where you could lose or drop the camera. Especially with deep water around. I have smashed a case but thankfully I haven’t lost one yet. Be aware of where it will swing though if there is a lanyard on it, last thing you want is it swing into the spokes on your bike or cause damage.

Stay out of the wind if you want audio. The wind affects the audio a lot. You can use different methods for different wind speeds like the skeleton back door or the frame but the best bet is to try and stay out of the wind if you want to hear people talking.


Return to Top